How To Tune a Carburetor
So your girl is running a little lean. That’s great if we’re not talking about your motorcycle, otherwise, it might be time for you to sit down with her and rejet the carburetor. Sound painful? It’s not really.
Simply put, carburetors use tiny little nozzles called jets that have holes in them in order to pass fuel into the air to make a fine mist. This mist is then sent to the combustion chamber where it is used to create energy that allows the engine to run. The smaller the holes in the jets are, the less fuel is pushed into the air, which makes for a less saturated air/fuel mist that is let into the combustion chamber. Less fuel means less of an explosion and therefore less power to run the engine. A lot of the time, this won’t be a huge problem. But if you are consistently noticing that your engine just isn’t getting the fuel it needs you can replace the stock jets with aftermarket ones that have larger holes in them and allow more fuel into the air/fuel mixture.
“But how do I know if my bike is running too lean or too rich?” you may ask. Well, often times you’ll be able to hear it. Sure, engines make some pretty weird noises especially if you’re running an older bike. But that popping or backfire is not necessarily healthy. If your bike is making some unhealthy sounds, check your spark plugs to see what color they are. If your spark plug is white, you’re engine needs more fuel. If the plug is black, you’re running too rich. It’s time for a rejet!
Now, the actual replacement of the jets isn’t brain surgery. However, you may find that tuning your carburetor afterward can be a bit of an annoyance. Still, first things first: the actual rejet.
Start by draining your carb and removing it. To get your carburetor as dry as possible, you’ll need to shut off the petcock, which will cut off the flow of gas from your tank to your carburetor. Then, you can unscrew the drain plug and let the gas make its way out and into a catch can or pan. A less messy way of draining your carb is to run your engine for a few minutes after you’ve shut the petcock. Do this in neutral with your bike still on its stand. The engine will eventually use up all of the gas in the carburetor before sputtering and stalling. This will take a few minutes but feel free to rev your throttle to speed the process up a little. Both of these processes will drain most of the fuel from your carb but be careful when removing it, as it may still have some residual fluid.
Next, remove the carb to make it easy to work with. Because each bike is so different, there will be a different process for each in order to take it out. Some bikes will require you to remove both the seat and the gas tank. If you’re not sure how yours should be removed, check with your good ol’ service manual.
With the carb off of your engine, remove any hoses still hanging on but be sure to pay close attention to where they go for when you reinstall. We like to keep a camera handy so that we can take pictures of anything that we may need to remember later on. (Just stick with Polaroid or digital so you won’t need to have those photos developed before putting your bike together.)
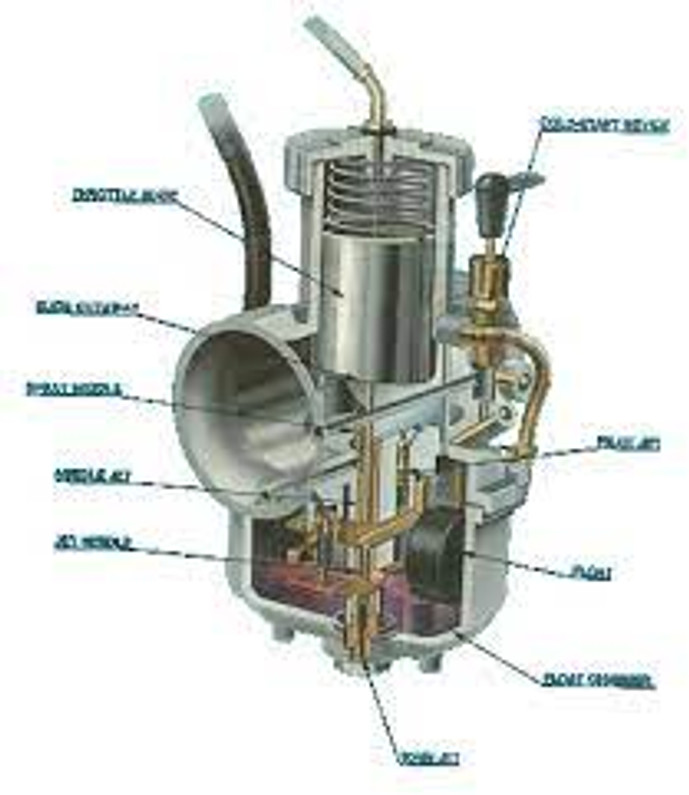
Take out the screws holding on the float bowl and remove it and its gasket from your carburetor. This should allow you to have access to the jets. On most carbs, you should be able to see the main jet in the center of the carburetor. This jet controls the amount of fuel when you’re at 3/4 to a wide open throttle. Next to it will be the pilot jet (or jets; there could be more than one), which controls the fuel level when you’re at idle to 1/4 throttle.
Unscrew these jets and replace them with the awesome new jets you got at www.speedmotoco.com The old jets will have a number on the side of them to tell you how large the hole for the gas is. If you’re trying to give your engine more gas, install jets with a larger number which means it has a bigger hole. To make your engine run leaner, install jets with a smaller number and therefore with smaller holes.
With the new jets installed, close her on up and head over to the carburetor’s top cap. Unscrew the bolts and remove the cap, diaphragm and spring. This should allow you to see the jet needle. This little guy controls the fuel when you’re at anything between 1/4 and 3/4 throttle.
Push it out of the diaphragm and you’ll see a tiny little circlip attached to some notches at the top of the needle. Note what notch this clip is on and, with pliers, pull off the circlip. If you’re putting your bike on a diet and want it to get less fuel, move the clip up a notch toward the top of the needle. To give your engine more fuel, move the clip down a notch toward the bottom of the needle. Then slide the needle back into the diaphragm, put the diaphragm back onto the carburetor’s body and screw back on the cap.
Easy enough, right? With everything back in place on the actual carburetor, reinstall it in your bike. Just make sure you reattach all of the right hoses into the right places.
Fire the motorcycle up and take it for a ride. This is where it could get tricky and most people lose their love for rejetting. As you ride your newly jetted motorcycle, listen to how it performs at all levels of throttle. Is the popping gone? Does it backfire? If those issues haven’t been eliminated by the new jets, chances are that you didn’t go big or small enough on the size. Another way to check if the new jets are the proper size is to look at your spark plugs after you’ve ran the engine for a while to see what color they are. If they’re back to a normal color, you’re dandy. Still either white or black? The new jets aren’t the right size.
If you find that the new jets didn’t do the trick, you’ll need to install some the next size bigger or smaller until you find that your engine is getting the right amount of fuel, which means taking out your carb, replacing the jets, reinstalling your carb and then testing it all over again. Repeat until you find the right size.
Your service manual can be a really helpful tool with all of this. Often times it will have a guide on what size jets you should be using based on certain factors such as altitude. Before you start the whole process you could save yourself a bit of time by taking a gander at it.
Rejetting your carburetor can be a pain if you can’t seem to get the right size jets. But it’s definitely not a very difficult procedure and it can really help the performance of your motorcycle. Still sound like too much work? Trade in your bike for a fuel injected one and never have to deal with jets again.
We hope this helped you to understand how to tune a Carburetor.
Recent Posts
-
HSR42 Kit Installation Instructions 42-7 42-18 easy Kit
Easy Kit Installation Instructions for The HSR series carburetors are precise yet durable inst …Mar 22nd 2024 -
Yamaha XS500 Electronic igntion Instructions
Remove the ignition coverMake LF MarkRemove OEM RotorRemove OEM Rotor and Plate- points and Condense …Mar 1st 2024 -
BMW Mikuni Carburetor Kits Available For R50/60/75/90/90/100
We have Mikuni carb kits available for just about every BMW under the sun. Direct bolt on aftermarke …Feb 8th 2024


